最近部署了一次正式服务器,有些心得体会,在这里记录一下。
使用的是腾讯云服务器,通过自己的预发布服务器,将代码使用rsync同步过去,同时设置了ngixn反向代理等配置了一个后台管理网站,方便处理,与api代码分开,不用每次都进行提交,这里主要介绍一些难点,部分脚本不会完整放出
首先是不允许正式服务器可被直接登录,只可被预发布服务器进行ssh连接
主要参考的是以上两篇文章,通过命令
scp id_rsa.pub root@192.168.65.129:/home/.ssh #冒号后面为目标服务器的目录将公钥发送到正式服务器,这里需要注意发送过去后的权限,可以通过
$ cd ~/.ssh#进入ssh目录
$ ll -a #查看所有文件,注意将权限改为0644即可,同时注意权限组,一般也不会用root
$ cat id_rsa.pub >> ~/.ssh/authorized_keys #这一步是将公钥写入认证文件
一般这样就可以在预发布通过ssh命令免密码登录目标服务器了
发布代码使用的是rsync脚本,这里就不详细分享了
配置nginx的时候遇到一个问题,就是nginx的反向代理,因为腾讯云的redis和mysql以及代码其实是在内网,暴露出来的只是公网ip而已,所以配置的时候代理的脚本需要写内网的ip才可以
![]()
这里配置了两个conf文件,https是api以及反向代理的脚本
upstream www_prerelease{
     server 172.16.0.14:8998 weight=1 fail_timeout=2s max_fails=2;
}

server {
    charset utf-8;
    client_max_body_size 128M;

    listen       80;
    listen       443 ssl;
    server_name  www.com;

    ssl_certificate      /etc/nginx/ssl/1_xxxxxxxxxxx.crt;
    ssl_certificate_key  /etc/nginx/ssl/2_xxxxxxxxxxxxxx.key;

    ssl_session_cache    shared:SSL:1m;
    ssl_session_timeout  5m;

    ssl_ciphers  HIGH:!aNULL:!MD5;
    ssl_prefer_server_ciphers  on;

    fastcgi_connect_timeout 300;
    fastcgi_send_timeout 300;
    fastcgi_read_timeout 300;


    root        /usr/local/html/*******/web;
    index       index.html index.php default.html;


    if ($scheme = http) {
       return 301 https://$host$request_uri;
    }
    location / {
       if (!-e $request_filename){
                rewrite ^/(.*) /index.php?s=$1 last;
                break;
        }
    }

    location ^~ /www-prerelease/ {
                proxy_pass http://www_prerelease/;
                #proxy_redirect default;
                proxy_set_header Host   $host;
                proxy_connect_timeout 2s;
                proxy_set_header X-Real-IP $remote_addr;
                proxy_set_header REMOTE-HOST $remote_addr;
                proxy_set_header X-Forwarded-For $proxy_add_x_forwarded_for;
                proxy_set_header X-Forwarded-Proto https;
        }

    location ~ \.php$ {
        include fastcgi_params;
        fastcgi_param SCRIPT_FILENAME $document_root/$fastcgi_script_name;
        fastcgi_pass   127.0.0.1:9000;
        #fastcgi_pass unix:/var/run/php5-fpm.sock;
        try_files $uri =404;
    }

    location ~ .*\.(gif|jpg|jpeg|bmp|png|ico|txt|js|css|woff|woff2|ttf|eot|svg)$ {

        add_header "Access-Control-Allow-Origin" "*";
        add_header "Timing-Allow-Origin" "*";

        root /usr/local/html/******/web;
        #expires 30d;
    }
}
release是监听的代理的8998端口,然后就是正常的配置方式
server {
    charset utf-8;
    client_max_body_size 128M;

    listen       8998;

    server_name  172.16.0.14;


    fastcgi_connect_timeout 300;
    fastcgi_send_timeout 300;
    fastcgi_read_timeout 300;


    root        /usr/local/html/***_release/prerelease/web;
    index       index.html index.php default.html;

    location / {
       if (!-e $request_filename){
                rewrite ^/(.*) /index.php?s=$1 last;
                break;
        }
    }

    location ~ \.php$ {
        include fastcgi_params;
        fastcgi_param SCRIPT_FILENAME $document_root/$fastcgi_script_name;
        fastcgi_pass   127.0.0.1:9000;
        #fastcgi_pass unix:/var/run/php5-fpm.sock;
        try_files $uri =404;
    }

    location ~ .*\.(gif|jpg|jpeg|bmp|png|ico|txt|js|css|woff|woff2|ttf|eot|svg)$ {

        add_header "Access-Control-Allow-Origin" "*";
        add_header "Timing-Allow-Origin" "*";

        root /usr/local/html/Interactive_release/prerelease/web;
        #expires 30d;
    }
}
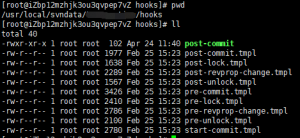
当配置后台管理网站代码时,使用的是
该目录下的post-commit文件,将内容改为通过ssh进入服务器并且执行update命令
#!/bin/sh

ssh lyt@111.222.333.44 'cd /usr/local/html/****_release/prerelease && svn update'
这样子release目录下的文件改变后通过svn上传,直接同步更新到了外网,方便管理后台调试
附录:
1.
netstat -nap | grep nginx # 方便查看nginx监听的端口2. 一般不会用root进行服务器操作,可能会建很多个用户,有时候需要sudo权限,可以这样设置
$ visudo  # 进入sudoers文件
寻找到root  ALL=(ALL)    ALL这一行,在下面新增
lyt ALL=(ALL) NOPASSWD: AL   即可
3. 服务器设置只允许某个ip访问端口
iptables -I INPUT -p TCP –dport 80 -j DROP       # 关掉80
iptables -I INPUT -s 46.166.150.22 -p TCP –dport 80 -j ACCEPT  # 只允许指定ip访问
service iptables save
service iptables restart
cat iptables 或者iptables -L
0 条评论